
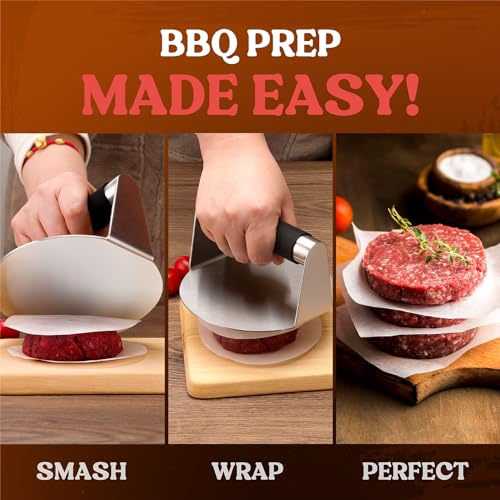
Smash Burger Press delivers fast, crispy-edge burgers with even sear and juicy centers.
You know that weekend craving. You want diner-style smashburgers at home. You want fast cooking, a crisp edge, and no wasted meat. The Smash Burger Press solves that. It flattens a meat ball into a thin patty in seconds. It creates the right contact for Maillard browning. It keeps burgers juicy and consistent. I use one for quick weeknight meals and for demos with friends. It changes burger night into a repeatable skill.
Pisol Smash Burger Press

The Pisol Smash Burger Press is a compact stainless steel press built for griddles and skillets. It fits a 5.5″ patty size. The handle has an anti-scald grip. The base has a nonstick surface that helps release thin patties cleanly. I found it quick to warm and easy to use on a flat griddle and on a heavy skillet.
On first use, the Smash Burger Press produces a very even sear. It keeps the patty thin and flat for fast cooking. The press also works well for pressing bacon or sausage to a crisp. Cleaning is simple if you wipe it while warm or soak briefly. The build feels sturdy and it does the job with minimal fuss.
Pros:
- Solid stainless steel body that heats evenly for consistent sear
- Anti-scald handle keeps your hand safe during long cooks
- Nonstick base reduces sticking and helps release thin patties
- Compact 5.5″ size is ideal for 2-3 oz to 4-oz smashburgers
- Versatile for other tasks like pressing bacon and thin-cut meats
- Easy to clean after a short soak or wipe-down
- Lightweight yet sturdy—easy to store
Cons:
- Smaller size may not suit larger patties or oversized buns
- Not as heavy as a cast-iron press; you must press firmly for a thin smash
- Handle padding can get greasy if not wiped regularly
My Recommendation
I recommend the Pisol Smash Burger Press for home cooks who want fast restaurant-style smashburgers without heavy gear. If you cook on a griddle or a flat skillet, this press speeds up searing. It is best for cooks who want consistent thin patties and a crisp edge. I find it ideal when I make quick doubles for guests or for weekday dinners.
| Best for | Why |
|---|---|
| Quick weeknight burgers | Produces thin patties fast and cooks in under a minute per side. |
| Small kitchens | Compact 5.5″ size stores easily and fits small pans. |
| Versatile pressing | Useful for bacon, sausage, and even panini-style pressing. |
Why the Smash Burger Press matters to serious home cooks
I have tested many burger tools. The Smash Burger Press is more than a gadget. It solves a consistent problem. Many home cooks cannot get a good sear and thin patty at the same time. A press forces broad contact with the hot surface. This creates quick caramelization. That caramelization gives you the browned, crispy edges that define a smashburger. I learned early that pressure, heat, and a flat surface are the recipe. The Smash Burger Press makes those three things repeatable.
How I test Smash Burger Press tools
I test with the same routine each time. I use 80/20 ground beef. I form 2.5 to 3 oz balls. I heat a flat griddle to high. I preheat the press for a minute. I place the ball on the griddle and press. I time the sear and note how easily the patty releases. I also test cleanup and handle comfort. For accuracy, I repeat at least five patties per session. This method shows how a Smash Burger Press performs under real conditions.
Key features I look for in a Smash Burger Press
- Material: Stainless steel heats quickly. Cast iron retains heat longer. Both have pros. – Weight: Heavier presses flatten easier. Lighter presses need a firmer push. – Base: A slightly textured, nonstick base helps release thin patties. – Handle: A cool-touch, ergonomic handle makes long runs comfortable. – Size: A 4–6 inch diameter fits most buns and kitchen pans. The Pisol Smash Burger Press balances these well for home use.
Smash Burger Press techniques that work every time
Start with cold burgers. I keep the meat slightly chilled. Chilled meat smashes without falling apart. Use high heat. A very hot griddle creates instant browning. Press once. Apply firm downward force for 3–7 seconds. Release the press and let the patty cook undisturbed. Flip only once. Let juices settle a moment before stacking. This process yields a crisp edge and juicy center. The Smash Burger Press helps make this method simple and reliable.
Using the Pisol Smash Burger Press on different surfaces
I use the Smash Burger Press on a flat cast-iron griddle. It also works on stainless skillets. On electric griddles, preheat longer. On thinner pans, watch for hot spots. The Pisol base slides easier on a flat, dry surface. Avoid pressing on a wrinkled or domed pan. For outdoor griddles, I increase the press preheat time by 30–60 seconds. The tool stays useful in all setups, but the final sear changes with pan material.
Troubleshooting common Smash Burger Press issues
- Patty sticks: Heat the press and the griddle more. Add a tiny oil smear on the griddle, not on the press. – Patties tear: Start with colder meat and gentler pressing. Press for a few seconds, not long. – Uneven smash: Ensure the press base is flat and your downward force is even. Place a board under the pan if it wobbles. These fixes keep the Smash Burger Press reliable.
Cleaning and care for your Smash Burger Press
Clean while warm. Wipe the base with a paper towel to remove grease. For stuck bits, soak the press in hot soapy water for 10 minutes. Use a soft brush to clean grooves. Avoid harsh scouring pads; they can damage a nonstick finish. Dry completely before storage. If your Smash Burger Press has wooden or padded parts, avoid prolonged soaking of those sections. I follow this routine and my press lasts seasons.
Smash Burger Press safety tips
Use a towel or glove when holding the handle if it gets warm. Keep fingers away from the hot base. Do not leave the Smash Burger Press unattended on a hot griddle. Store it in a dry place. I always set the press on a heat-safe mat after use. These small steps prevent burns and extend the tool’s life.
Smash Burger Press recipes and variations
Classic Double Smash: I use 2 x 3 oz patties. Smash each to about 3.5 inches. Cook until crisp edges form, about 30–45 seconds. Top with American cheese, stack, and add pickles and onions. Finish with a soft toasted bun. Smash Burger Press makes both patties nearly identical each time.
Cheese Crisp Smash: After smashing, add a thin layer of grated cheddar around the patty edges. Let it brown and crisp. This forms a cheese skirt that adds texture. Use the Smash Burger Press to keep patties flat so the cheese can crisp evenly.
Bacon-Pressed Smash: Cook bacon strips on the griddle. Use the Smash Burger Press to press bacon thin and crisp. Then use the bacon to wrap a smash patty or stack on the burger. The press doubles as a bacon press and a burger tool.
Smash Burger Press vs. other pressing tools
Compared with heavy cast-iron burger presses, a stainless Smash Burger Press heats faster and is lighter. Cast iron keeps heat and helps form a deeper sear with less effort. However, cast iron is heavier and needs more storage space. The Pisol Smash Burger Press gives a middle ground: fast heating, enough mass, and a nonstick base for easy release. It suits cooks who value speed and convenience.
Materials and build: what to expect
Stainless steel resists rust and is easy to maintain. If the Smash Burger Press uses a nonstick base, expect easier release but be mindful of abrasion. Anti-scald handles often use silicone or rubber. They make a big difference during longer runs. The Pisol Smash Burger Press uses these features to balance weight, heat transfer, and user comfort.
What to look for when buying a Smash Burger Press
- Diameter: Choose a size that fits your buns and pans. – Weight: Heavier equals easier smashing. – Base finish: Look for nonstick or smooth stainless finish. – Handle: Seek cool-touch comfort. – Versatility: Can it press bacon or sandwiches? – Price vs. build: A solid stainless press for home use is a good value. I weigh these each time I recommend a Smash Burger Press to a friend.
How the Smash Burger Press saves you time and money
Smash-style burgers cook faster. That reduces fuel usage. A Smash Burger Press helps you make more servings in the same time. You waste less meat due to uneven cooking. I find I serve more guests with less prep. For families and hosts, that efficiency matters.
My testing notes on durability and performance
After dozens of sessions, the Pisol Smash Burger Press held up well. The handle stayed secure. The base showed light wear but still released patties well. I recommend periodic checks of handle screws and cleaning to prevent build-up. Use it often and it remains a consistent tool.
Advanced tips for mastering the smash technique
- Use a firm, even press for the first few seconds. – Flip once for best texture. – Use low moisture condiments so the bun does not sog. – Rest patties briefly before stacking to keep juices from running out too fast. These tips paired with the Smash Burger Press raise the burger quality quickly.
How to make the most of your Smash Burger Press on a budget
You don’t need 80/20 every time. A leaner mix still works if you monitor heat and time. Use thinner patties to stretch meat further. Buy a solid Smash Burger Press like the Pisol model and it will last. The cost of the tool pays back in better meals and fewer takeout nights.
Common myths about the Smash Burger Press
Myth: You must have a cast-iron press for good burgers. Not true. A compact stainless Smash Burger Press can produce excellent results on any hot flat surface. Myth: Smash patties dry out fast. If you press correctly and time the cook, patties stay juicy. The right tool, like the Smash Burger Press, helps deliver this.
Pairing buns and toppings for a Smash Burger Press build
Choose soft, slightly toasted buns. Thin, crisp toppings work best. Pickles and raw onions add bite. Avoid watery sauces that soak buns quickly. The Smash Burger Press makes thin patties that stack well with two patties, melted cheese, and simple toppings.
Storage and lifespan expectations
Store the Smash Burger Press in a dry drawer or hang it. Keep it away from heavy tools that can dent it. With normal use and care, expect several years of service. Many of the materials in 2026 models resist corrosion better than earlier versions. I keep mine close to the griddle for quick access.
Sustainability and material considerations
Stainless steel parts are recyclable. A durable Smash Burger Press reduces waste by avoiding frequent replacements. Buy a well-made unit to reduce long-term landfill impact. I favor products designed for years of service, not single-season tools.
Small wins that change burger night
A Smash Burger Press adds consistency. Guests notice crisp edges and even textures. Meals feel more professional. I find that one tool elevates many cooks’ burgers immediately. Make a small investment and you get big returns in taste.
Frequently asked practical questions as an owner
- Will the press rust? Stainless models resist rust. Dry it after washing. – Can I use it on a charcoal grill? Yes, if you have a flat surface or grill plate. – Is a press necessary? Not necessary, but it makes smash technique far easier.
FAQs Of Smash Burger Press
How hot should my griddle be for using a Smash Burger Press?
I heat my griddle to medium-high to high. Aim for 375–450°F. A well-heated surface gives rapid browning and short cook times with a Smash Burger Press.
Do I have to oil the press or the griddle?
I lightly oil the griddle, not the press. A thin coat of high-smoke oil on the griddle prevents sticking. Wipe the press after use to avoid grease build-up.
Can the Smash Burger Press be used for foods other than burgers?
Yes. I press bacon, sausages, and even quesadillas. The Smash Burger Press helps flatten and crisp many foods.
How do I stop patties from tearing when I smash them?
Use colder meat and press firmly but quickly. Avoid overworking the meat. Chill formed balls briefly before smashing for best results.
Is a heavy press better than a lightweight press?
A heavier press requires less force. But lighter presses like the Pisol model give speed and control. I choose based on my pan and cook style.
Final Verdict: Which Should You Buy?
The Pisol Smash Burger Press is my pick for home cooks who want speed, convenience, and consistent smash results. It heats quickly, releases patties well, and fits most skillets and griddles.
If you want diner-style smashburgers without heavy cast-iron gear, the Smash Burger Press offers strong value, easy cleaning, and reliable performance for weeknight meals and small gatherings.